Note: This will erase all data on the specified disk
Launch Apple's Disk Utility
Open a Finder window and navigate to Applications > Utilities and double click on Disk Utility.
The remaining steps vary considerably depending on the operating system you are running. Choose About This Mac from the Apple menu to determine your current OS, then make a selection below.
- macOS 11Big Sur, 10.15 Catalina, 10.14 Mojave, and 10.13 High Sierra
- macOS 10.12 Sierra and OS X 10.11 El Capitan
- OS X 10.10 Yosemite
Instructions for Big Sur, Catalina, Mojave, and High Sierra
Watch a video of this tutorial on YouTube
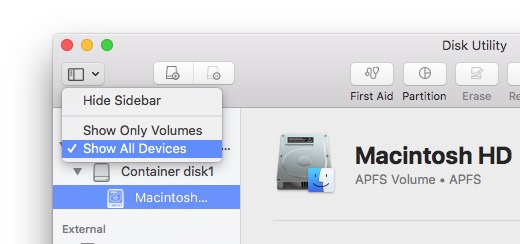
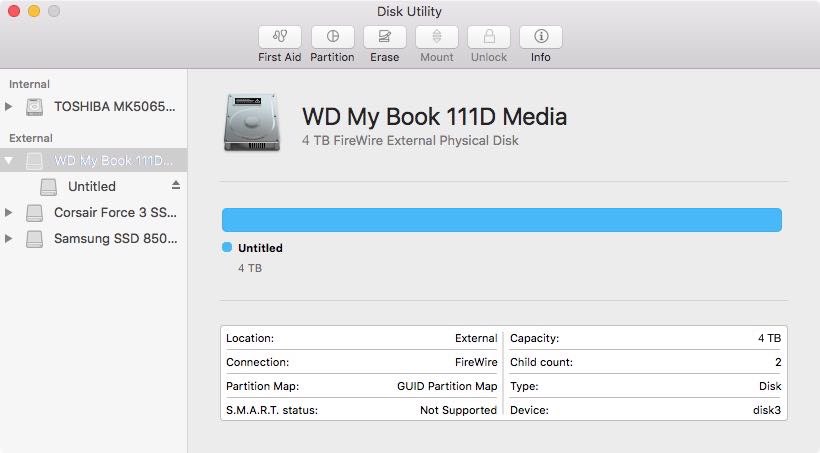
Show All Devices
Disk Utility offers a very simplified view of your devices by default. Unfortunately, this hides the devices that you need to select to modify the partitioning of your backup disk. Before doing anything else in Disk Utility, choose Show All Devices from the View menu, or from the View popup button in Disk Utility's toolbar.
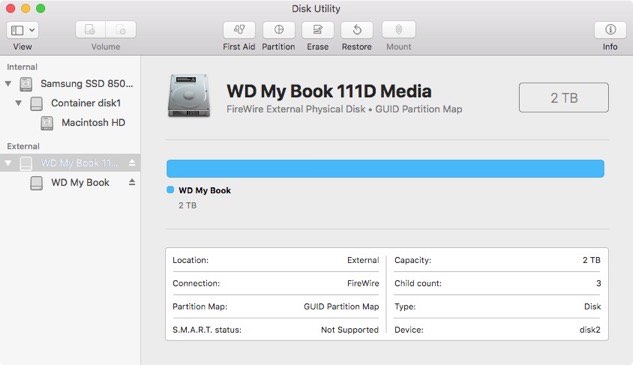
Select the destination disk
Click to select the disk that you would like to use as the destination for your CCC task. This disk should not be the same as your startup disk.
The name of a new disk will often include the manufacturer’s name (e.g. WD My Book 111D Media...). A startup disk will often include the manufacturer's serial number in the title (e.g. TOSHIBA MK50...). Please pay particular attention to selecting the disk, not one of the volumes on the disk. You must select the whole disk to correctly initialize the device. If your disk is a Fusion device, you may erase the "container" within it instead.
Unmount any volumes on the specified disk
Disk Utility occasionally has problems with unmounting a volume while attempting to erase it (e.g. because Spotlight prevents the unmount request). Click the Eject button next to any volumes on the disk to preemptively unmount them before erasing the disk.
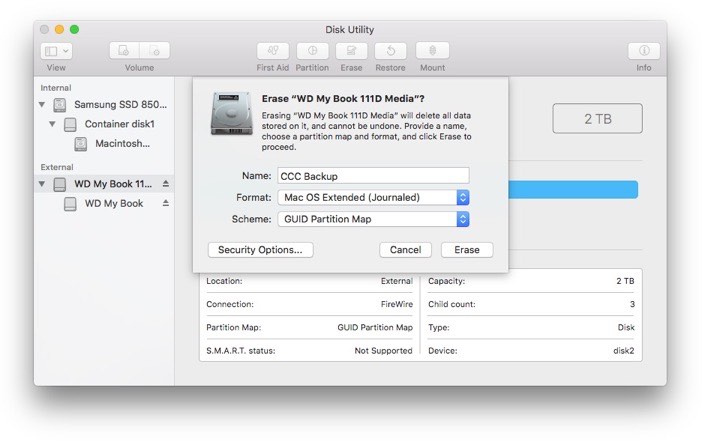
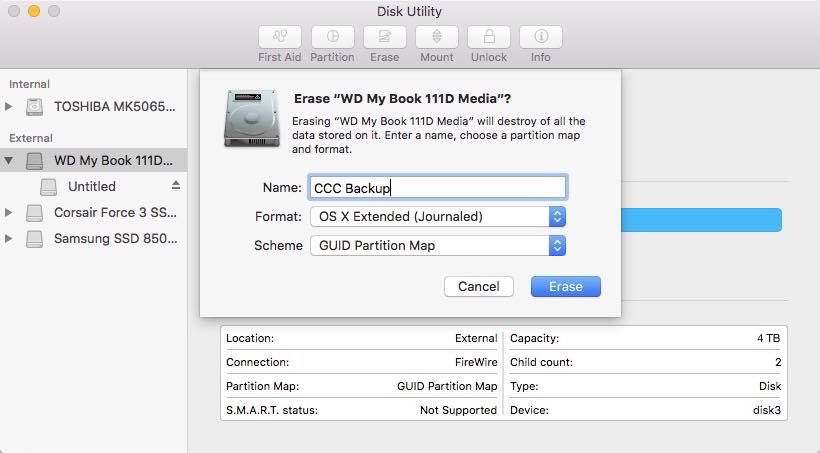
Erase the specified disk
Click on the Erase button in Disk Utility's toolbar, then configure the name, format, and partitioning scheme of your disk. You can set the name to whatever you like, but set the Scheme to GUID Partition Map. If you do not see the Scheme option, go back two steps and select the whole disk device, not one of the volumes on the disk.
Choosing a Format for your destination volume
If your destination device is an HDD with a rotational speed of 5400RPM (or slower): (e.g. "Slim" backup devices, 2.5" disks) APFS is not designed for these devices, macOS boot performance may be poor. You can format these devices as APFS and try to make a bootable backup, but if the performance of the device is too slow to be practical, then we recommend you choose Mac OS Extended (Journaled) for the format. If you are making a backup of a Big Sur or Catalina startup disk, you should create a Data-only backup to avoid the conversion of the destination filesystem to APFS.
Big Sur, Catalina, and Mojave: Choose APFS if you are backing up your startup disk or another installation of macOS. Do not choose APFS Encrypted. You can encrypt your backup by enabling FileVault while booted from the backup volume.
High Sierra: both APFS and Mac OS Extended (Journaled) are acceptable formats for a backup of the system. Mirroring Apple's recommendations, we recommend that you choose APFS if your destination device is an SSD and will be used to back up macOS, or if you are backing up a T2-based Mac and you intend to enable encryption on the backup. Choose Mac OS Extended (Journaled) if your destination device is a spinning-platter-based device (i.e. a hard disk drive, or HDD), or if you are backing up an operating system older than 10.13.
Click the Erase button when you are finished configuring the name, format, and partition scheme for your destination. If you are given an Erase Volume Group choice, choose that option to erase the whole volume group.
Add a partition (optional)
If you're backing up multiple source volumes to this same backup disk, you can keep things organized by creating partitions. If you formatted your backup volume as APFS, select the volume and choose "Add APFS volume..." from Disk Utility's Edit menu. If you chose another format, select the backup volume, then click the "Partition" button in Disk Utility's toolbar.
Your new hard drive is now ready to accept backups created by Carbon Copy Cloner!
Instructions for El Capitan and Sierra
Select the destination disk
Click to select the disk that you would like to use as the destination for your CCC task. This disk should not be the same as your startup disk.
The name of a new disk will often include the manufacturer’s name (e.g. WD My Book 111D Media...). A startup disk will often include the manufacturer's serial number in the title (e.g. TOSHIBA MK50...).
Erase the specified disk
Click on the Erase button in Disk Utility's toolbar, then configure the name, format, and partitioning scheme of your disk. You can set the name to whatever you like, but set the Format to Mac OS Extended (Journaled) and set the Scheme to GUID Partition Map, then click the Erase button.
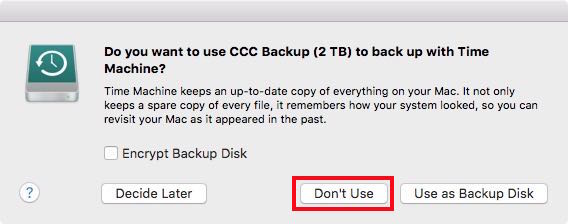
Don't Use Time Machine
Click Don’t Use. You may use the same backup disk for both Time Machine and CCC backups, but if you do so, you must use a dedicated partition for the Time Machine backup. Otherwise Time Machine will consume all available space on the backup volume and make it impossible for CCC to use the backup volume.
Your new hard drive is now ready to accept backups created by Carbon Copy Cloner!
Instructions for Yosemite
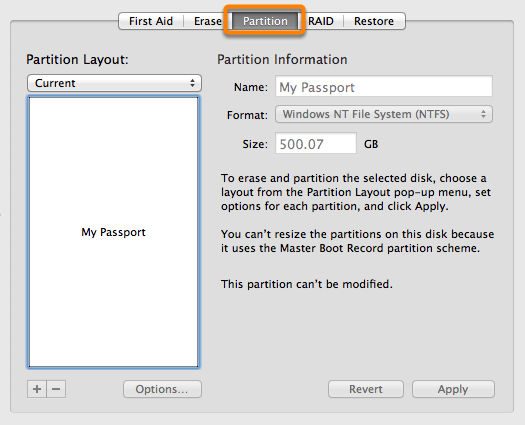
Select the destination disk
Click to select the disk that you would like to use as the destination for your CCC task. This disk should not be the same as your startup disk.
The name of a new disk will often include the storage capacity and manufacturer’s name (e.g. 500.07 GB WD My Passp...). A startup disk will often include the manufacturer's serial number in the title (e.g. 320.07 GB TOSHIBA MK3255GSXF Media).
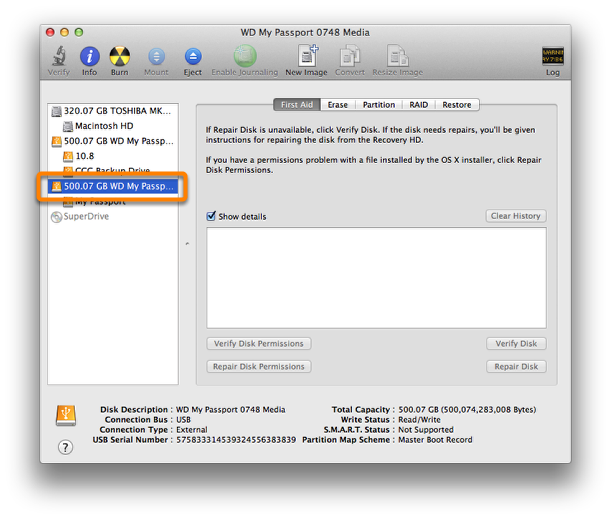
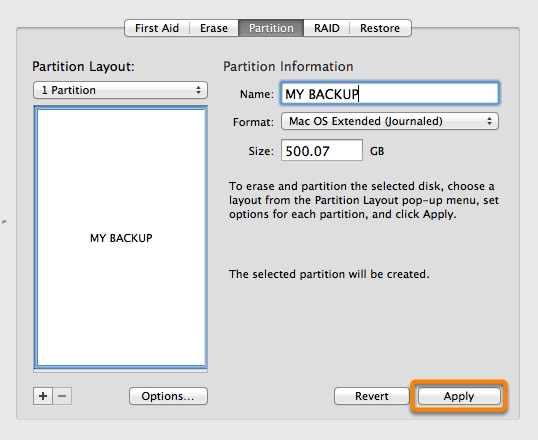
Partition the disk
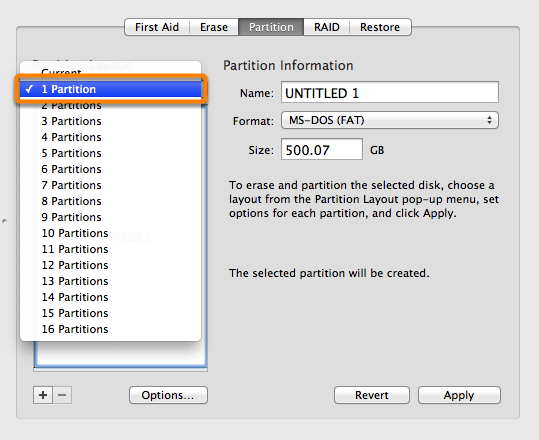
Click on the Partition tab.
Choose 1 Partition from the Partition Layout popup menu (or more if desired).
Click on Options.
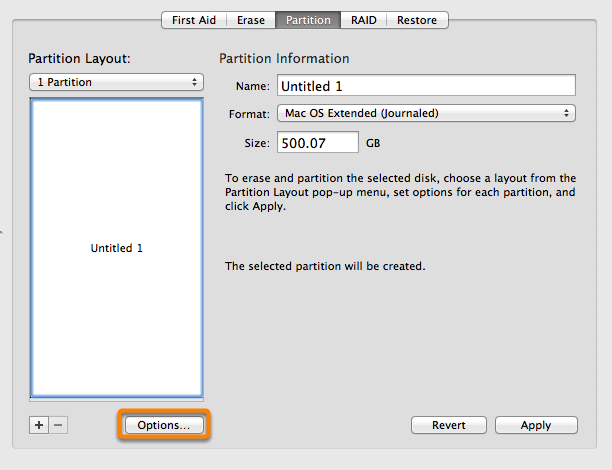
Choose GUID Partition Table, then click the OK.

Name the Volume
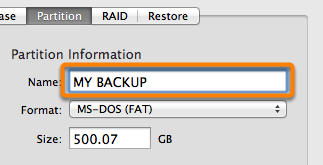
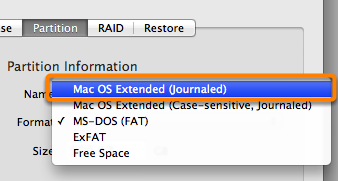
Format the Volume
Select Mac OS Extended (Journaled) from the Partition Format popup menu.
Click Apply.
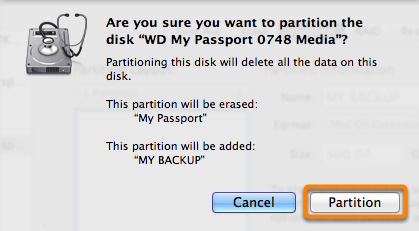
Ensure that you have selected the correct disk. This step will delete all data from the selected disk. Click Partition.
Now skip ahead to the remainder of the instructions that are not OS-specific.