Se desideri che CCC invii i risultati via e-mail devi configurare un account e-mail d'invio nelle Impostazioni e-mail di CCC.
- Fai clic sulle Preferenze nella barra strumenti di CCC.
- Clicca sul pulsante Impostazioni e-mail nella barra strumenti della finestra delle Preferenze.
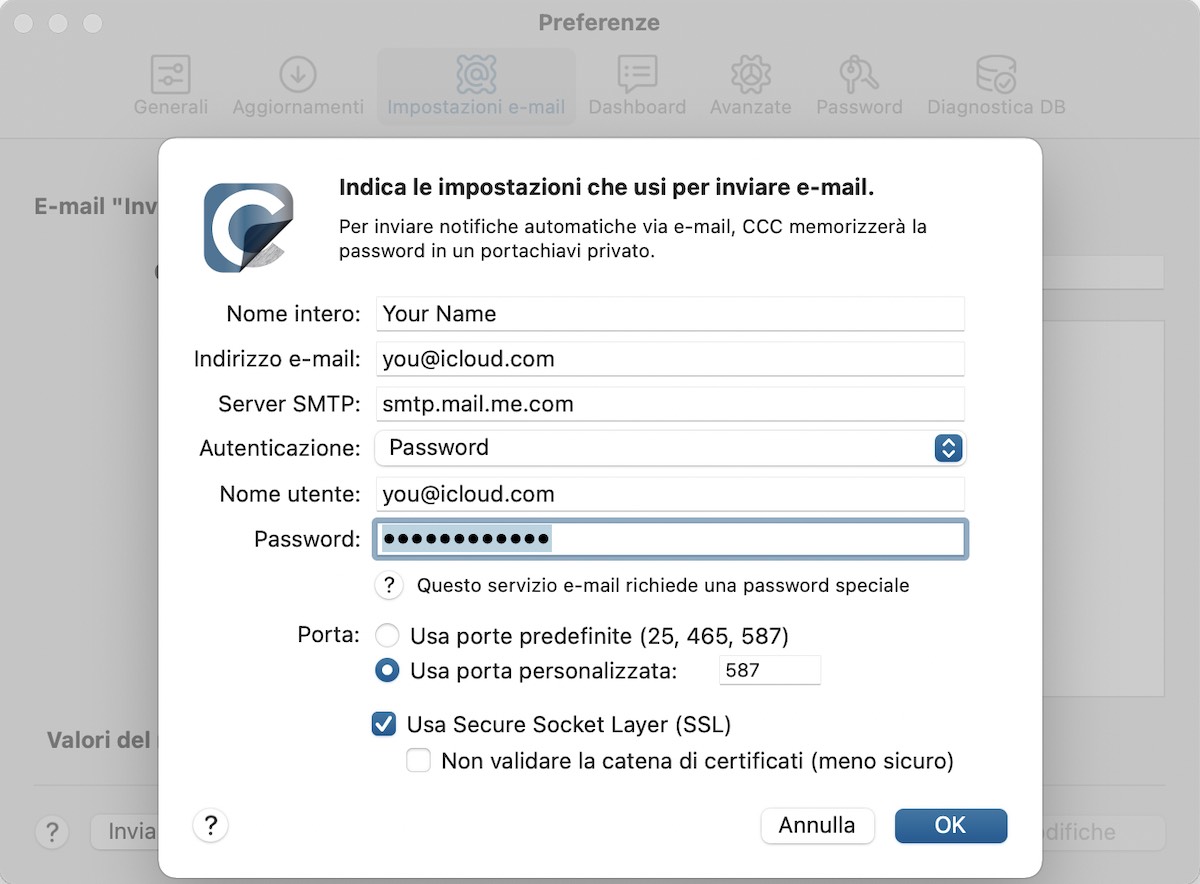
- Seleziona uno degli account importati da Mail nel menu a comparsa Inviato da E-mail quindi verifica i dettagli e inserisci le credenziali dell'account nel modulo fornito.
- Clicca sul pulsante OK quando hai finito di inserire i dati dell'account.
Avviso per gli utenti esperti: se il server SMTP richiede SSL e usa certificati di sicurezza autofirmati spunta la casella Non validare la catena di certificati. In alternativa puoi aggiungere il certificato di sicurezza del tuo server al portachiavi del Sistema nell'applicazione Accesso Portachiavi e autorizzare il certificato.
[Opzione] Modificare il modello di oggetto e corpo dell'e-mail
È possibile personalizzare l'oggetto e il corpo dell'email che CCC invia dopo aver completato l'operazione. Ad esempio, se vuoi sapere da quale Mac è stata inviata una determinata e-mail, puoi personalizzare l'oggetto del messaggio:
iMac di Paolo: ##Nome dell'operazione##: ##Stato di uscita##
Quando CCC invia una notifica via e-mail, sostituirà i valori del modello (tra il doppio simbolo #) con i valori della tua operazione, ad es.:
iMac di Paolo: Backup giornaliero: Backup completato con successo
La maggior parte dei valori del modello sono già presenti nel modello predefinito. Puoi riorganizzare i valori del modello e modificare il testo, ma non modificare il testo all'interno del doppio simbolo #. Se vuoi aggiungere un valore al modello:
- Posiziona il cursore dove vuoi inserire il valore del modello, ad es. nella casella oggetto o testo.
- Seleziona un valore modello dal menu a comparsa Valori del modello.
- Clicca sul pulsante Inserisci.
Quando hai finito di modificare i valori per l'oggetto e il testo fai clic sul pulsante Salva modifiche. Questo modello sarà usato per tutte le notifiche inviate da CCC.
Se hai dei suggerimenti per ulteriori valori del modello, informaci!
Inviare un'e-mail di prova
Clicca sul pulsante Invia e-mail di prova… in basso nella finestra. Ti sarà richiesto di fornire un indirizzo e-mail per inviare l'e-mail di prova. Quando CCC segnala che è stata inviata un'e-mail di prova, verifica la tua casella di posta elettronica per confermare che l'hai ricevuta e che il modello contiene le informazioni che vuoi ricevere quando un'operazione è stata completata.
Selezionare un livello di notifica
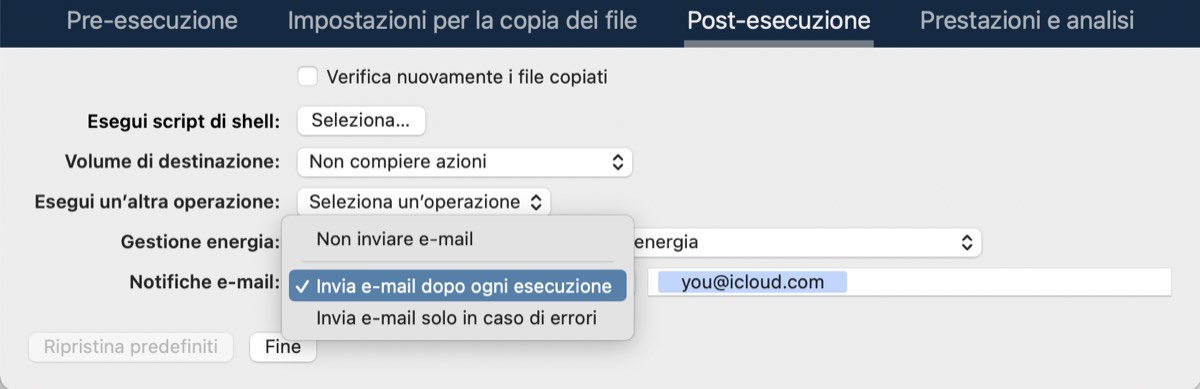
Chiudi la finestra delle Preferenze, quindi seleziona l'operazione alla quale vuoi aggiungere le notifiche e-mail. Clicca sul pulsante Impostazioni avanzate in fondo alla finestra, quindi seleziona il pannello Post-esecuzione per mostrare le opzioni delle notifiche e-mail. Sono disponibili tre livelli di notifica:
- Non inviare e-mail: CCC non invierà e-mail quando l'operazione è stata completata.
- Invia dopo ogni esecuzione: CCC invierà un'e-mail alla fine di ogni operazione (ad es. operazioni completate con successo e quelle che segnalano degli errori).
- Invia solo in caso di errori: CCC invierà un'e-mail solo in caso di errori per questa operazione.
Seleziona un livello di notifica, quindi specifica uno o più indirizzi e-mail ai quali vuoi che CCC invii l'e-mail dopo il completamento dell'operazione. Se vuoi inviare un'e-mail a indirizzi multipli, separa gli indirizzi con una virgola o premi il tasto 'A capo' dopo l'inserimento di ogni singolo indirizzo. La casella del destinatario può mostrare un solo indirizzo alla volta. Usa il tasto freccia per vedere tutti gli indirizzi.
Dopo aver configurato il livello di notifica e i destinatari, seleziona Salva dal menu Operazione di CCC per salvare le modifiche.
Inviare e-mail con un servizio SMTP che richiede una Password per le app
Poiché CCC invia e-mail da un'applicazione in background, possibilmente quando nessun utente è connesso, CCC non può praticamente supportare l'autenticazione a due fattori. Molte applicazioni hanno questo stesso vincolo logistico e la maggior parte dei provider di posta elettronica permette a tali applicazioni di utilizzare il servizio SMTP, a condizione che sia stata creata una password specifica per l'applicazione a tale scopo. Quando tenti di inviare un'e-mail con il tuo account Gmail o iCloud (ad esempio) e ricevi un errore "il nome utente e la password non sono validi" o "l'autenticazione non è riuscita", è possibile risolvere il problema creando una password per l'applicazione.
Visita la pagina del tuo account dell'ID Apple e crea una password specifica per l'applicazione CCC:
- Accedi alla pagina dell'account dell'ID Apple.
- Nella sezione Sicurezza fai clic sul link Genera password... sotto il titolo PASSWORD SPECIFICHE PER LE APP e segui i passi indicati.
- Incolla la password specifica per l'applicazione nel pannello Impostazioni e-mail della finestra Preferenze di CCC.
- Nota: Assicurati di usare un indirizzo e-mail @mac.com, @me.com o @icloud.com per il nome utente.
Riferimenti Apple: Come usare le password specifiche per le app
Visita la pagina della Sicurezza del tuo account per generare una password specifica per l'applicazione CCC:
- Accedi alla tua pagina di Sicurezza Account.
- Fai clic sul link Genera password per l'app in fondo a questa pagina.
- Fai clic su Seleziona app e scegli Altra app. Inserisci CCC come nome personalizzato.
- Fai clic sul pulsante Genera.
- Copia e incolla la password specifica per l'applicazione nel pannello Impostazioni e-mail della finestra Preferenze di CCC. Nota: consigliamo di copiare e incollare il codice. Se scegli di trascriverlo fai attenzione a non inserire spazi. Il codice viene presentato in quattro gruppi, ma in realtà non contiene spazi; contiene esattamente 16 caratteri.
Visita la pagina di profilo AT&T per generare una password specifica per l'applicazione CCC. AT&T non usa il termine standard del settore "password specifica per l'applicazione" ma lo chiama "secure mail key" (chiave di posta sicura):
- Visita il tuo profilo AT&T e seleziona Sign-in info.
- Seleziona l'account e-mail che necessita di una chiave di posta sicura. (Troverai una menu in alto se disponi di più account.)
- Scorri a Secure mail key e seleziona Manage secure mail key.
- Seleziona l'indirizzo e-mail che vuoi usare se ne hai più di uno.
- Seleziona Add secure mail key, quindi inserisci un nickname per la chiave di posta sicura per facilitare il riconoscimento (ad es. "CCC").
- Seleziona Create secure mail key.
- Seleziona Copy secure mail key to clipboard
- Incolla la password specifica per l'applicazione nel pannello Impostazioni e-mail della finestra Preferenze di CCC.
Crea una chiave di posta sicura, configura o aggiorna la posta elettronica AT&T - Apple Mail (OS X)
Visita la pagina delle Password dell'applicazione Gmail per generare una password specifica per l'applicazione CCC:
- Visita la pagina Password per le app.
- Fai clic su Seleziona app e scegli Altro (nome personalizzato). Inserisci CCC.
- Fai clic sul pulsante Genera.
- Incolla la password specifica per l'applicazione nel pannello Impostazioni e-mail della finestra Preferenze di CCC. Nota: consigliamo di copiare e incollare il codice. Se scegli di trascriverlo fai attenzione a non inserire spazi. Il codice viene presentato in quattro gruppi, ma in realtà non contiene spazi; contiene esattamente 16 caratteri.
- Nota: Assicurati di usare un indirizzo @gmail.com per il nome utente. Gli account G Suite non sono supportati.
Riferimenti Google: Accedere con le password per le app
Visita la pagina delle Password di Outlook.com per generare una password specifica per l'applicazione CCC:
- Vai alla pagina Nozioni di base sulla sicurezza e accedi con il tuo account Microsoft.
- Seleziona Altre opzioni di sicurezza.
- Sotto Password per le app seleziona Crea una nuova password per l'applicazione. Una nuova password per l'applicazione viene generata e visualizzata sullo schermo
- Incolla la password specifica per l'applicazione nel pannello Impostazioni e-mail della finestra Preferenze di CCC. Nota: consigliamo di copiare e incollare il codice. Se scegli di trascriverlo fai attenzione a non inserire spazi.
Riferimento Microsoft: Uso di password per le app
"Il tuo account Gmail non permette a CCC di inviare notifiche e-mail"
Google insiste molto che gli sviluppatori di applicazioni di terze parti raggiungano un account di sviluppatore Google e si iscrivano alle API proprietarie di Google per poter utilizzare una particolare forma di autenticazione con gli account Gmail (OAuth2). Invece gli sviluppatori che scelgono di utilizzare meccanismi di autenticazione standard del settore sono ingiustamente considerati come "meno sicuri" e, per impostazione predefinita, Google nega le richieste di autenticazione da queste applicazioni. Per aggiungere al danno la beffa, quando un'applicazione tenta di autenticarsi in Gmail utilizzando i metodi di autenticazione standard del settore, Google ti invia un'e-mail che suggerisce che l'applicazione richiedente "non soddisfa gli standard di sicurezza moderni".
CCC utilizza assolutamente standard di sicurezza moderni, in particolare TLS, per proteggere tutto il traffico verso il server SMTP. TLS possiede e continua ad essere il moderno standard di sicurezza per la protezione delle comunicazioni e-mail. Se ricevi un messaggio che ti informa che il tuo account Gmail non permette a CCC di inviare e-mail, abbiamo due suggerimenti:
- Abilita la verifica in due passaggi sul tuo account Google e poi crea una password specifica per l'applicazione per CCC [questa è la nostra raccomandazione principale]
— Oppure —
- Cambia le impostazioni nel tuo account Gmail che Google ha disattivato
In alternativa puoi specificare un account e-mail che non sia di Google nelle impostazioni e-mail nella finestra delle Preferenze di CCC.
Aggiorna le tue credenziali SMTP dopo la migrazione sul nuovo Mac
Quando fornisci a CCC le credenziali SMTP, CCC le archivia in modo sicuro in un file portachiavi di macOS. Questo file portachiavi è protetto in diversi modi; è leggibile solo dall'account amministratore di sistema macOS, può essere sbloccato solo da CCC e può essere sbloccato solo sul Mac sul quale è stato creato originariamente. Di conseguenza, se acquisti un nuovo Mac e trasferisci i tuoi dati sul nuovo Mac, il portachiavi di CCC non funzionerà sul nuovo sistema e CCC non potrà inviare notifiche via e-mail.
Dopo la migrazione a un nuovo sistema, apri le Impostazioni e-mail di CCC, fai clic sul pulsante Modifica…, quindi inserisci nuovamente le credenziali dell'account SMTP.
Come posso rimuovere account e-mail più vecchi elencati nel menu a comparsa degli Account e-mail di CCC?

CCC raccoglie in modo dinamico le informazioni degli account e-mail dal servizio Account di macOS quando apri la finestra delle preferenze. Gli account e-mail elencati sotto l'intestazione "Account macOS SMTP" non sono account e-mail che CCC mantiene nelle proprie preferenze, ma provengono dal pannello delle preferenze degli account nell'applicazione Preferenze di Sistema. Questi account non possono essere rimossi dall'interno di CCC, ripetiamo, perché CCC non mantiene le informazioni su questi account. Se vuoi rimuovere questi account dal tuo Mac puoi rimuoverli nel pannello delle preferenze Account, nell'applicazione Preferenze di Sistema.