Watch a video of this tutorial on YouTube
macOS imposes privacy restrictions that disallow, by default, access to certain application data (e.g. Mail, Messages, Safari, Photos), and all access to any external hard drives and network volumes.
macOS does not conveniently ask you to grant access to an application when that application tries to access that data. Instead, you're required to manually pre-approve the application. As a result, when you download an application specifically to back up your most precious data, that application can't back up that data until you specifically go out of your way to grant it access to that data.
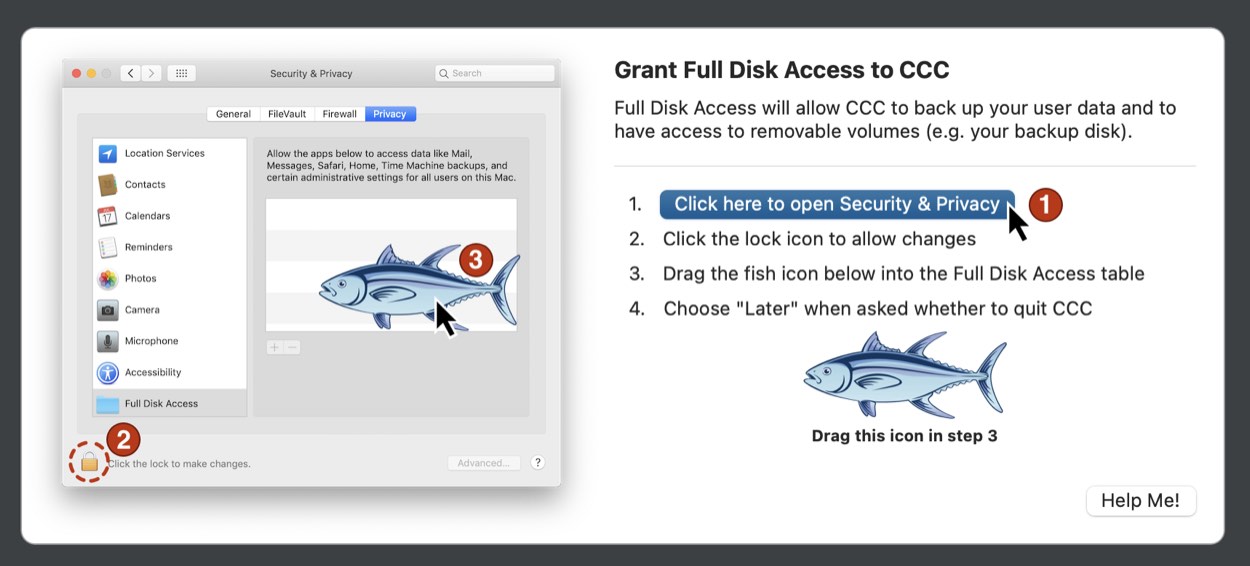
To proactively grant CCC and its helper tool full disk access, choose "Grant CCC Full Disk Access..." from the Carbon Copy Cloner menu.

CCC's Install Assistant, indicated in the screenshot above, will guide you through the pre-approval procedure that grants CCC and its helper tool full disk access.
Catalina, Big Sur, Monterey only: To begin, click the button to open the Privacy & Security panel in the System Settings application. CCC will take you directly to the Full Disk Access category. Click the padlock icon in the lower-left corner of the Privacy window to allow changes.
Ventura, Sonoma: When you start to drag the CCC Privacy Fish, the following happens automatically: the System Settings application will open, the Privacy & Security panel will open, the Full Disk Access panel will be selected. On these newer OSes, simlpy start dragging the fish, then wait for the System Settings application to appear.
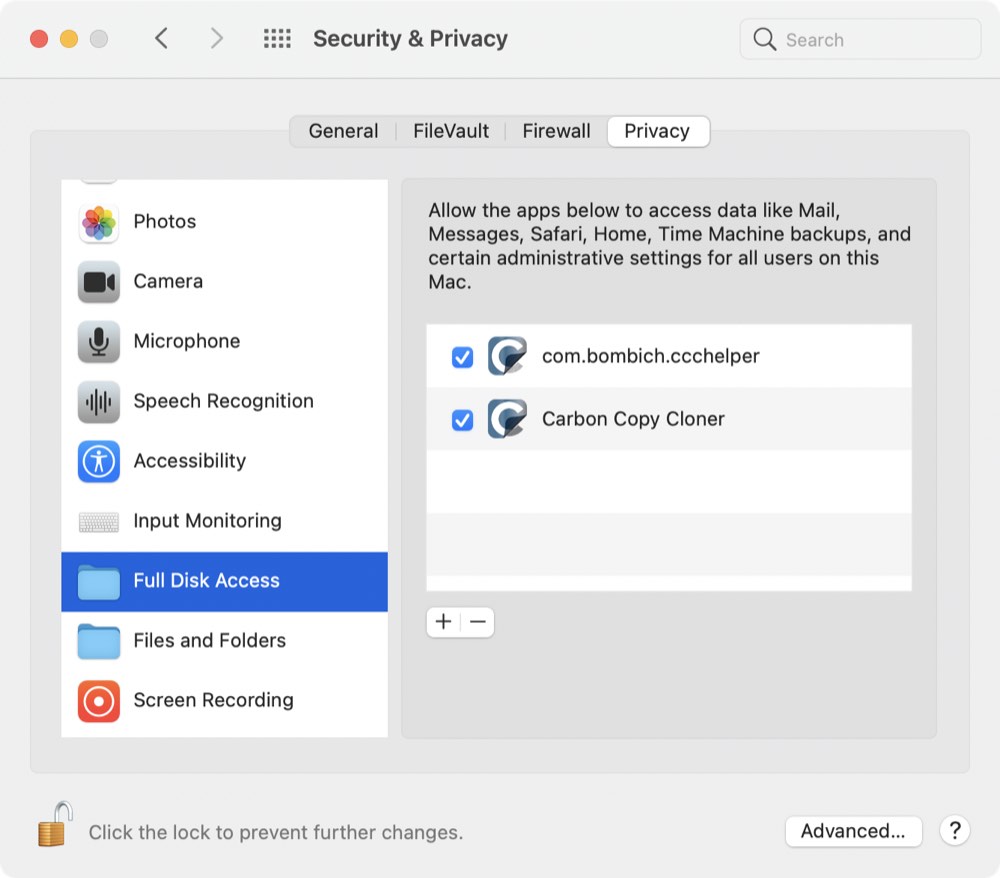
Next, drag the fish icon from CCC's Install Assistant onto the table in the Privacy window. This icon represents two separate files on your Mac — the Carbon Copy Cloner application and its privileged helper tool, so when you drop this onto the Privacy table, you will see both "Carbon Copy Cloner.app" and "com.bombich.ccchelper" appear in that table. Once you have granted CCC's helper tool full disk access, CCC will dismiss its Install Assistant and resume whatever task led up to the presentation of the Install Assistant. You can close the System Settings window at that point, and if you're prompted to quit CCC now or later, you can choose the "Later" option.
"I added CCC to the Full Disk Access category but I still get errors"
Watch a video of this tutorial on YouTube
It seems intuitive to add the Carbon Copy Cloner application to the Full Disk Access list. Unfortunately, Apple's Privacy measures don't work in an intuitive manner when an application leverages a privileged helper tool. Following Apple's Best Practices for performing tasks with elevated privileges (e.g. backing up your startup disk), CCC leverages a privileged helper tool for managing all aspects of your backup task. Therefore, CCC's privileged helper tool ("com.bombich.ccchelper", or errantly just "com.bombich" on Ventura and Sonoma) also needs Full Disk Access. After granting full disk access to CCC and its helper tool, the Full Disk Access table should look like this:

Related Documentation
Manually granting full disk access to CCC's privileged helper tool
If accessibility challenges make the drag and drop procedure too difficult, you can follow the steps below to grant full disk access to CCC's privileged helper tool.
- Open the Privacy & Security panel in the System Settings application (Pre-Ventura: System Preferences > Security & Privacy)
- Click on the Privacy tab
- Pre-Ventura: Click the padlock in the lower-left corner to allow changes
- Click on Full Disk Access in the categories table
- Click the + button
- Navigate to the root-level of your startup disk (e.g. Macintosh HD) > Library > PrivilegedHelperTools
- Select com.bombich.ccchelper
- Click the Open button
Troubleshooting Full Disk Access problems
Apple doesn't offer developers an interface to the macOS Full Disk Access privacy settings, which is why we have to walk you through the odd procedure documented above. We asked Apple to give us an interface similar to that offered for other privacy settings (e.g. access to your camera), "Would you like to grant full disk access to CCC?" Apple indicated that they specifically do not want it to be that easy. Lacking this interface, we don't have any insight into the privacy settings. For example, we can't tell whether you have granted this access to CCC, nor whether you have specifically revoked it. We must stoop to poking at various files on the system to see if we might have access, then proceed as best as possible based on the result. Unfortunately, that method is not very reliable, so there are scenarios where CCC believes that it has full disk access but does not, or cases where it does have full disk access, but concludes that it does not.
Over the last several years we've found a few common problems that lead to this confusion around whether CCC does actually have full disk access, e.g. the macOS service that decides which apps have access is simply making the wrong call or there is corruption within the privacy settings database. In some cases CCC appears to have full disk access for one volume but not another, suggesting that there may be a problem with a particular volume, or its APFS container. We recommend the following steps to troubleshoot these problems:
- Verify that both "com.bombich.ccchelper" and "Carbon Copy Cloner" are listed in the Full Disk Access list, and that the boxes next to them are checked, then try the task again
- Restart the Mac, then try the task again
- If the problem appears to be specific to one destination volume, then erase that volume in Disk Utility, reselect the destination in CCC, then try the task again
- Reset the privacy settings database (paste
tccutil reset Allinto the Terminal application, then press the Return key), then re-grant Full Disk Access to CCC and its helper tool, then try the task again. Note: Resetting the privacy settings database will clear out all previously-granted privacy exceptions in the Security & Privacy Preference Pane. Unfortunately Apple does not provide a more granular way to troubleshoot privacy control problems.
