macOS Mojaveには、特定のアプリケーションデータ (例: メール、メッセージ、Safari、写真) へのアクセスをデフォルトで許可しないという新しいプライバシーの制限が加わりました。これまでもカレンダーや連絡先などのアプリケーションに関連するデータに制限が課されていましたが、これらの以前の制限とは異なり、macOS Mojaveは権限アプリケーション (CCCのファイルコピー機能など) にも同様にこれらの制限を課すようになりました。macOS Catalinaではこれらのプライバシーの変更内容がさらに広く適用され、アプリケーションはいかなる外部ハードドライブおよびネットワークボリュームにもアクセスできなくなりました。
さらに複雑なことには、macOSは、アプリケーションがそのデータにアクセスを試みる時、アプリケーションにアクセスを許可するかをユーザに確認しないということです。その代わり、事前にアプリケーションを承認するための長い手続きを完了するよう要求されます。その結果、最も貴重なデータをバックアップするために特別にアプリケーションをダウンロードしても、あなたがそのデータへのアクセスを許可するように手続きを完了するまでそのアプリケーションはそのデータをバックアップできません。
CCCとそのヘルパーツールにフルディスクアクセスを前もって許可しておくには、Carbon Copy Clonerメニューから“ CCCにフルディスクアクセスを許可…”を選択してください。
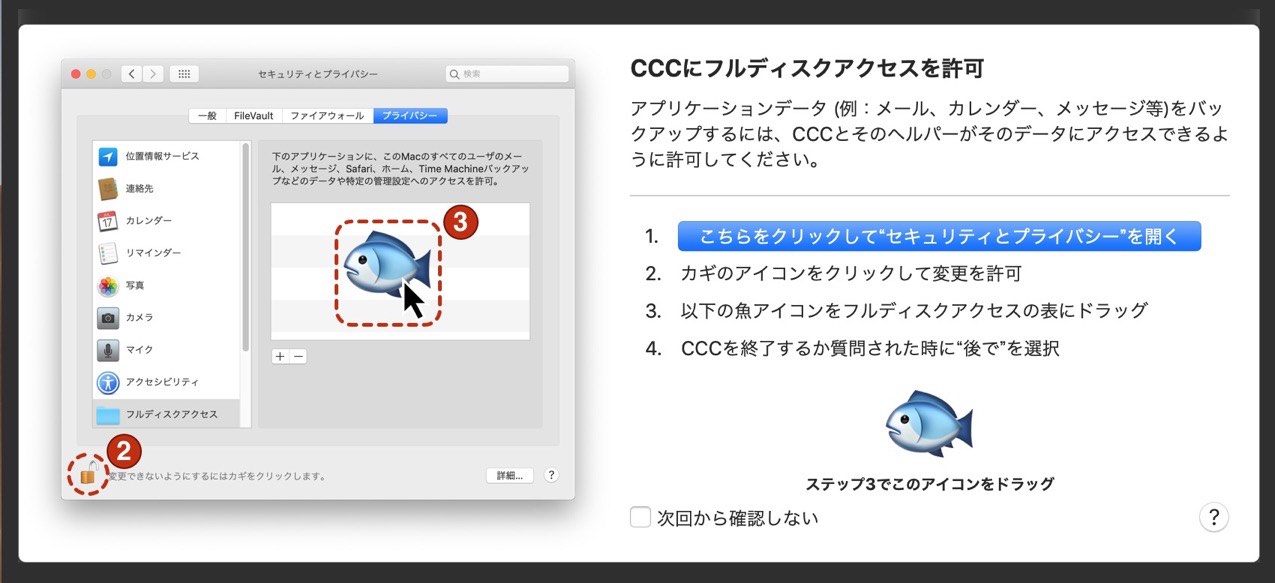
CCCのインストールアシスタントは、上のスクリーンショットが示すように、CCCとそのヘルパーツールにフルディスクアクセスを許可できるように、事前の承認手続きを案内します。まず、ボタンをクリックしてシステム環境設定の“セキュリティとプライバシー”のパネルを開きます。CCCは直接“プライバシー”タブに移動して、フルディスクアクセスのカテゴリーを選択します。次に、“プライバシー”ウインドウの左下のカギアイコンをクリックして、変更を許可してください。次に、CCCのインストールアシスタントから魚のアイコンを“プライバシー”ウインドウの表にドラッグしてください。このアイコンはMac上で、Carbon Copy Clonerのアプリケーションとその権限ヘルパーツールの、2つの別のファイルを表します。そのため、これをプライバシーの表にドロップすると、“Carbon Copy Cloner.app”と “com.bombich.ccchelper”の両方がその表に表示されます。CCCのヘルパーツールにフルディスクアクセスを許可すると、CCCはインストールアシスタントを終了して、インストールアシスタントを実行する前にしていたタスクを再開します。この時点で、システム環境設定を閉じて構いません。CCCを今すぐ終了するか、後にするかを確認された場合、“後で”を選択することができます。
CCCのクローニングコーチは、CCCのヘルパーツールがデータの一部にアクセスできない場合に警告を表示します
起動ディスクをタスクのバックアップのためのソースとして選択し、かつCCCの権限ヘルパーツールにフルディスクアクセスをまだ許可していない場合、そのタスクを保存または実行する際にCCCのクローニングコーチから注意喚起が表示されます。クローニングコーチから出される“アクセスを許可…”のボタンをクリックすると、CCCは上のスクリーンショットに示されている、インストールアシスタントを表示します。
同様に、CCCの権限ヘルパーツールにフルディスクアクセスを許可しないでバックアップタスクを続け、CCCが何かしらをバックアップできない場合、CCCのタスク履歴ウインドウで注意喚起のエラーが、“アクセスを許可…”のボタンと共に表示されます。
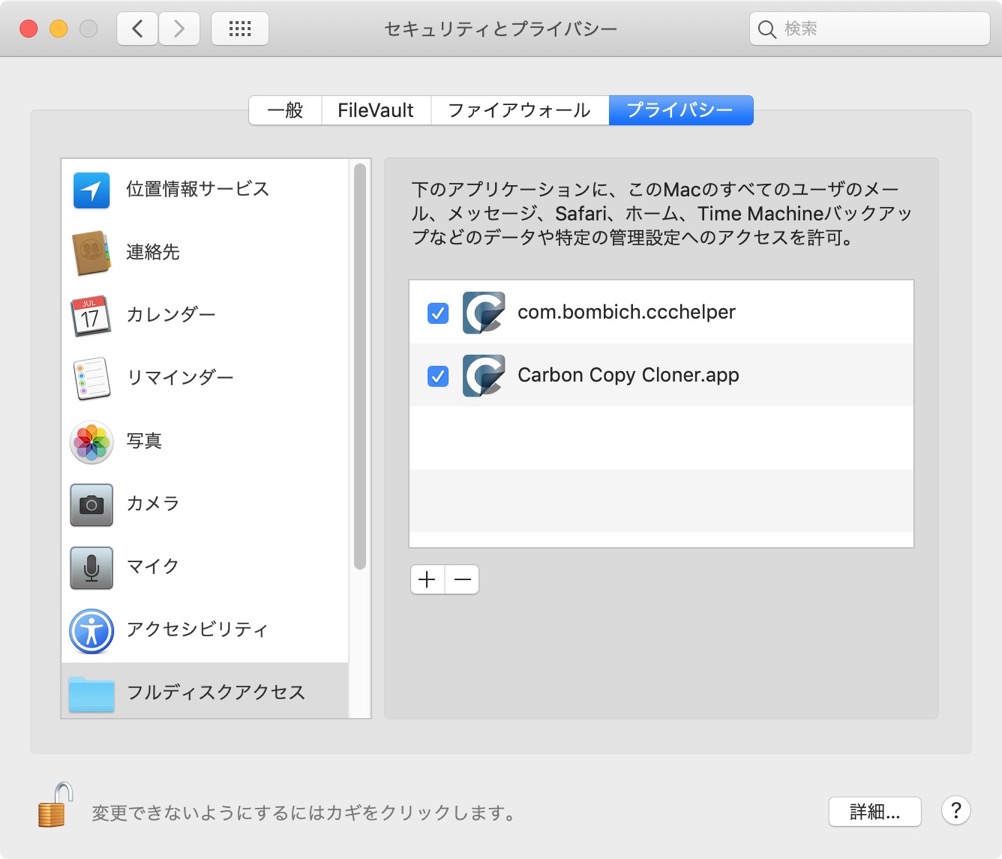
“Carbon Copy Clonerをフルディスクアクセスのカテゴリに追加しましたが、まだエラーが表示されます”
Carbon Copy Clonerのアプリケーションをフルディスクアクセスのリストに追加することは直感的なようです。残念ながら、アプリケーションが権限ヘルパーツールを利用する場合、Appleのプライバシー対策は直感的な方法では動作しません。高度な権限をもつタスク (例:起動ディスクをバックアップする) を実行するためのAppleのベストプラクティスに従い、CCCはバックアップタスクのすべての局面を管理するために権限ヘルパーツールを利用します。そのため、フルディスクアクセスが必要なのはCCCの権限ヘルパーツール ("com.bombich.ccchelper") であって、メインアプリケーションではありません。CCCとそのヘルパーツールにフルディスクアクセスを許可した後、フルディスクアクセスの表は以下のように見えるはずです:
関連ドキュメント
手動でCCCの権限ヘルパーツールにフルディスクアクセスを許可
アクセシビリティのために、ドラッグ&ドロップが困難な場合は、以下のステップに従って、CCCの権限ヘルパーツールにフルディスクアクセスを許可してください。
- システム環境設定の“セキュリティとプライバシー”のパネルを開きます
- “プライバシー”タブをクリックします
- 左下のカギのアイコンをクリックして変更を許可します
- カテゴリの中から フルディスクアクセス をクリックします
- + ボタンをクリックします
- 起動ディスクのルートレベル (例:Macintosh HD) > ライブラリ > PrivilegedHelperTools と進みます
- com.bombich.ccchelper を選択します
- 開く をクリックしてください
ESET Cyber Securityがプライバシー環境設定パネルと干渉することがある
ESETソフトウェアが環境設定の“セキュリティとプライバシー”の“プライバシー”タブの設定の変更を妨げるという報告を数件受け取っています。“フルディスクアクセス”のカテゴリに項目を追加できない、かつESETをインストールしているという場合は、CCCとそのヘルパーツールにフルディスクアクセスを許可する前に、一時的にESETをアンインストールしてください。CCCにフルディスクアクセスを許可した後、ESETを再インストールすることができます。
私のMacはHFS+フォーマットされたボリュームから起動していて、フルディスクアクセスリストに変更を加えられません
現在の起動ディスクがHFS+フォーマットされている場合、macOSは“プライバシー”のデータベースに変更を加えることを許可しません。バックアップをHFS+フォーマットされたボリュームに作成する前に、CCCにフルディスクアクセスを許可しておかないと、そのボリュームから起動中、CCCにフルディスクアクセスを許可することはできません。その結果、CCCはお使いのユーザデータの大部分を復元できなくなります。以下の方法でこの問題を解決してください:
- ディスクユーティリティを使用してコピー先ボリュームをAPFSとして消去する
- macOS Mojaveをダウンロード して、macOSをコピー先ボリュームにインストールする
- 移行アシスタントを使って、データをHFS+フォーマットのバックアップから新しくインストールされたMojaveに移行する
移行が完了したら、CCCを開いて、新しい起動ディスクを元の(オリジナルの)バックアップディスクにバックアップするタスクを設定してください。この時、先に進む前にCCCにフルディスクアクセスを与えておくと、今後、再インストールと移行アシスタントの手間を省くことができます。CCCとそのヘルパーツールにフルディスクアクセスを前もって許可しておくには、Carbon Copy Clonerメニューから“ CCCにフルディスクアクセスを許可…”を選択してください。